
This lesson is made with PSPX9
But is good with other versions.
© by SvC-Design

Materialen Download :
Here
******************************************************************
Materials:
alpha_belle_en_rouge.pspimage
coin Cloclo.png
femme Guismo.png
oiseau.png
Pinceau_Floral.png
sg_honeycomb-bubbles.PspMask
vase Cloclo.png
Watermark_Pour tuto.png
******************************************************************
Plugin:
Plug-ins - I.C.NET Software / Filters Unlimited 2.0 - Filter Factory Gallery A - Seismic
Plugin - Graphics plus - Cross Shadow
Plugin - I.C.NET Software - Filters Unlimited 2.0 - Filter Factory Galery H - Ripple Mirror
Plugin - Textures - Grain
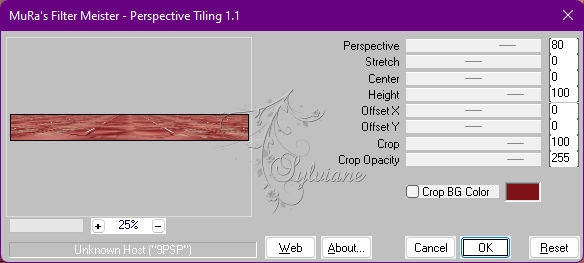
Plugin - MuR'as Meister - Perspective Tiling
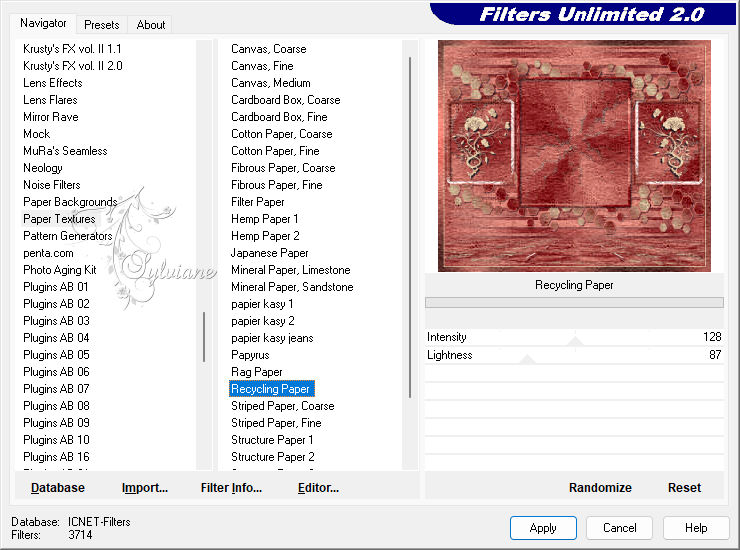
Plugin - <I.C.NET Software> - Filters Unlimited 2.0 - Paper Textures - Recycling Paper
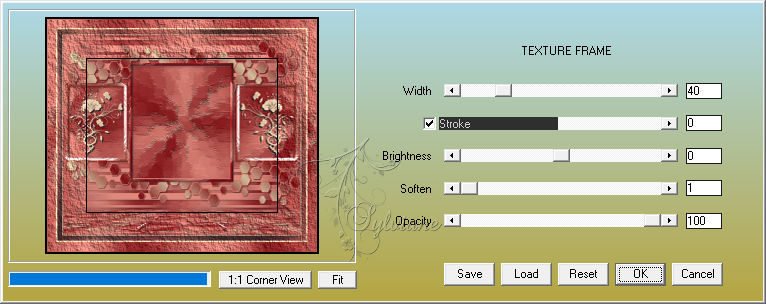
Plug-in - AAA Frame - texture frame
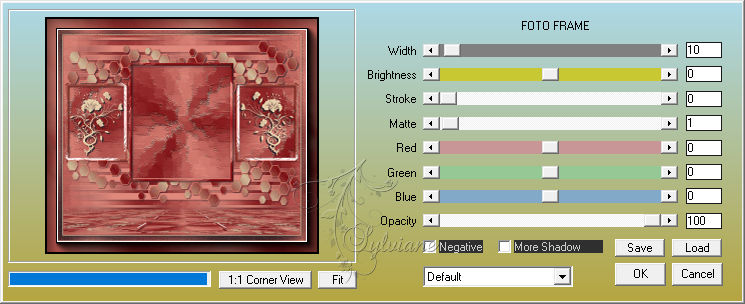
Plug-in - AAA Frame - FOTO FRAME
******************************************************************
color palette
:

******************************************************************
methode
When using other tubes and colors, the mixing mode and / or layer coverage may differ
******************************************************************
General Preparations:
First install your filters for your PSP!
Masks: Save to your mask folder in PSP, unless noted otherwise
Texture & Pattern: Save to your Texture Folder in PSP
Selections: Save to your folder Selections in PSP
Open your tubes in PSP
******************************************************************
We will start - Have fun!
Remember to save your work on a regular basis
******************************************************************
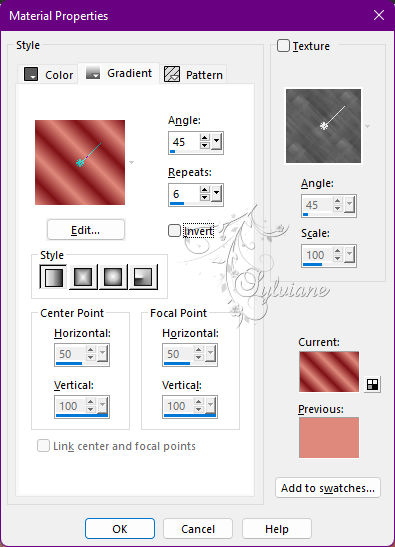
1.
In color palette / Highlight color1 / Color background color2 / Plus 3 more colors
Foreground 1 - Background 2
Prepare a Radial gradient

2.
Open Alpha channel belle_en_rouge
Layers - Duplicate
Close original
Rename raster1
Fill with gradient
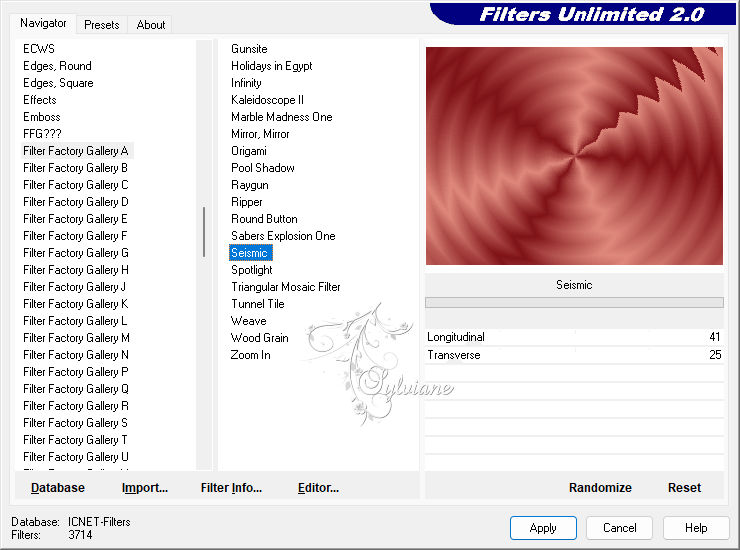
Plug-ins - I.C.NET Software / Filters Unlimited 2.0 - Filter Factory Gallery A - Seismic
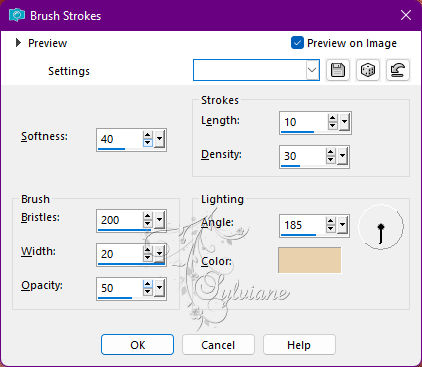
Effects - Art and Media - Brush strokes
3.
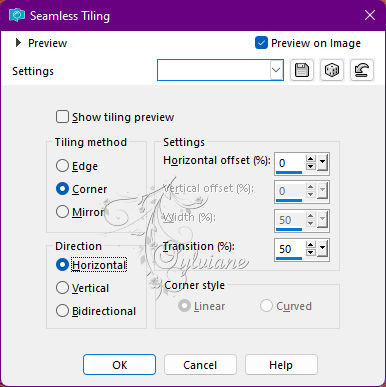
Effects - Image Effects - Seamless Tiling
Open sg_honeycomb-bubbles.PspMask
Layers - New raster layer
Fill with color1
Layers - New Mask Layer - From Image - sg_honeycomb-bubbles.PspMask
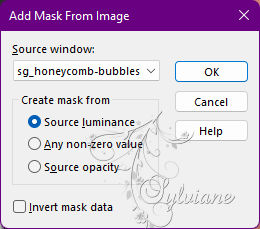
Adjust – scharpness – scharpen more
Layers - Merge - Merge Group
Effects - 3D Effects - Drop Shadow
2 / 2 / 65 / 12 color:#000000
4.
Prepare a Linear gradient with current colors

Layer - New raster layer
Selection – Load/Save Selection – Load Selection from Alpha Channel - Cloclo1
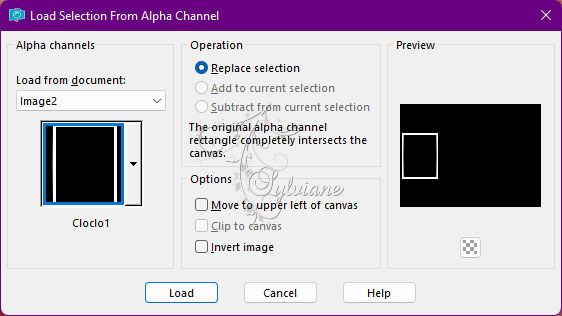
Fill with Linear gradient
Leave the selection active
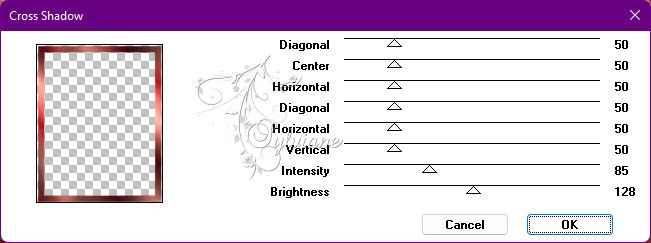
Plugin - Graphics plus - Cross Shadow
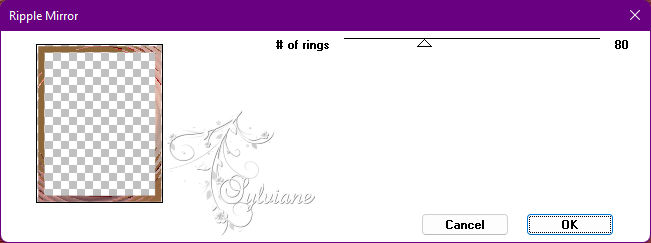
Plugin - I.C.NET Software - Filters Unlimited 2.0 - Filter Factory Galery H - Ripple Mirror
Effects – 3D effects – inner bevel
Selection - Select None
5.
Effects - 3D Effects - Drop Shadow
4 / 4 / 65 / 4 color:#000000
Layers - Duplicate
Image - Mirror – mirror Horizontal
Layers – merge – merge down
Layers - New raster layer
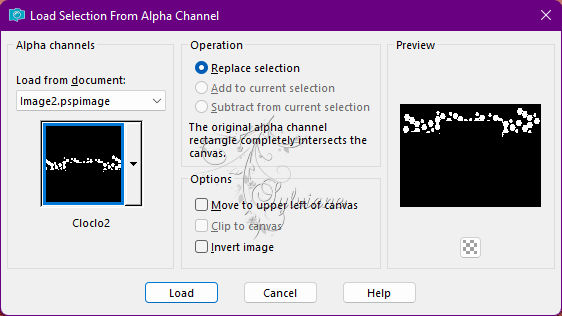
Selection – Load/Save Selection – Load Selection from Alpha Channel - Cloclo2
Fill Linear gradient in memory - But in the foreground / Color3
Plugin - Textures - Grain

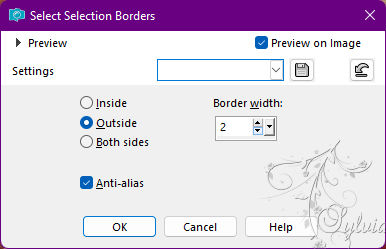
Selections - modify - select selection borders
Fill with color4
Effects – 3D effects – inner bevel – as before
Selection - Select None
Effects - 3D Effects - Drop Shadow
2 / 2 / 65 / 4 color:#000000
Layers – merge – merge down
6.
Prepare a Linear gradient with foreground color3 / Background color2
Layer - New raster layer
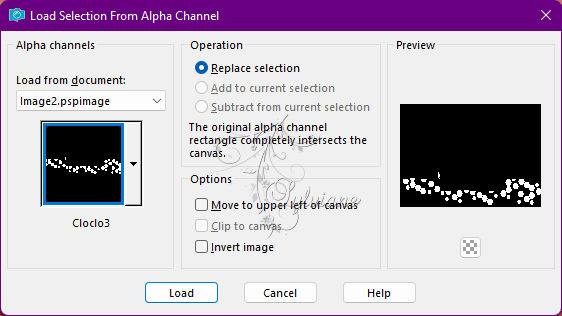
Selection – Load/Save Selection – Load Selection from Alpha Channel - Cloclo3
Fill with Linear gradient
Plugin - Textures - Grain - as before
Selections - modify - select selection borders – as before
Fill with color4
Effects – 3D effects – inner bevel – as before
Selection - Select None
Effects - 3D Effects - Drop Shadow
2 / 2 / 65 / 4 - color:#000000
Layers – merge – merge down
Layer - New raster layer
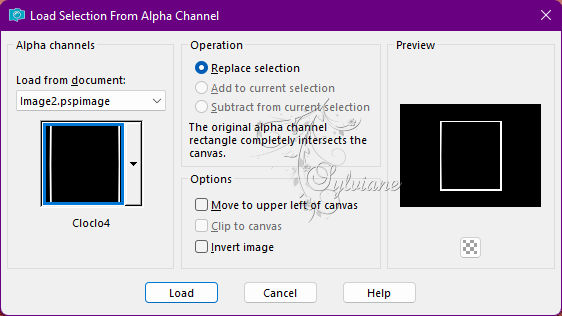
Selection – Load/Save Selection – Load Selection from Alpha Channel - Cloclo4
Fill linear gradient / Foreground color 1 / Background 2 / Unchecked invert
Plugin - Graphics plus - Cross Shadow – as before
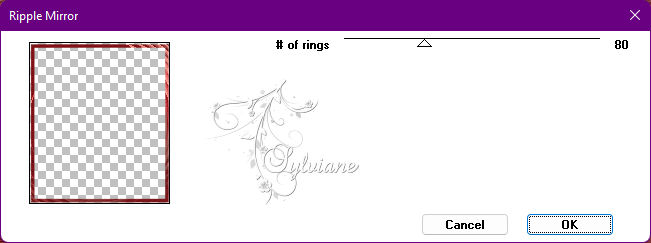
Plugin - I.C.NET Software - Filters Unlimited 2.0 - Filter Factory Galery H - # Ripple Mirror of rings at 80
Effects – 3D effects – inner bevel – as before
Selection - Select None
Effects - 3D Effects - Drop Shadow
2 / 2 / 65 / 4 color:#000000
7.
Bring color 3 to the foreground
Layers - New raster layer
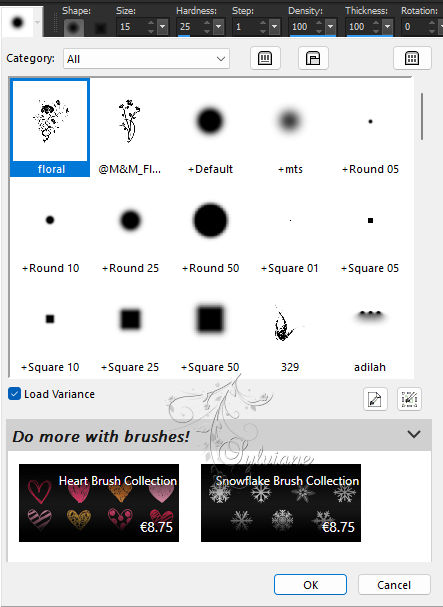
Open Pinceau_Floral.png
Export / Custom Brush / Put Name / And OK
Return to your tag
Click on the brush tool / Locate your brush / And put / Size261

Two clicks in the left rectangle
Letter M - To deselect
Effects - 3D Effects - Drop Shadow
5 / 5 / 100 / 20 - Color2
Adjust – scharpness – scharpen
Layers - Duplicate
Image - Mirror – mirror Horizontal
Layers – merge – merge down
8.
You position on the bottom layer
Edit - copy
Edit paste as a new image - Set aside
Return to your tag
Layers - Merge - Merge visible layers
Edit - Copy
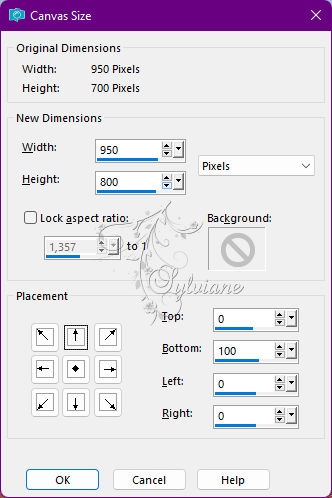
Image – canvas size
With the magic wand - Tolerance 0 - Select the transparent part of the bottom
Layers - New raster layer
Edit - Paste into selection
Plugin - MuR'as Meister - Perspective Tiling - Default
Selection - Select None
Effects - 3D Effects - Drop Shadow
15 / 15 / 100 / 45 - Color 5
9.
Layers – merge – merge down
Edit - Copy
Image - Add Borders – Symmetric - 1 pixel - Color 2
Image - Add Borders – Symmetric - 3 pixel - Color 3
Select - Select All
Image - Add Borders – Symmetric – 20 pixels - Color 1
Selections - Invert
Edit - Paste into selection - it is in memory
Adjust - blur - gaussian blur
Radius at 25
Plugin - Graphics Plus - Cross Shadow – as before
Plugin - <I.C.NET Software> - Filters Unlimited 2.0 - Paper Textures - Recycling Paper
Effects - Edge Effects - Enhance
Selections - Invert
Effects - 3D Effects - Drop Shadow
8 / -8 / 100 / 45 - Color5
Selections - Select All
9.
Image - Add Borders – Symmetric – 1 pixel - Color 1
Image - Add Borders – Symmetric – 5 pixel - Color 3
Selection - Select All
Image - Add Borders – Symmetric – 40 pixels - Color 1
Selection - Invert
Go find the image set aside
Edit - copy
Edit - paste in the selection
Plug-in - AAA Frame - texture frame - Default
Plug-in - AAA Frame - FOTO FRAME
Selection - Invert
Effects - 3D Effects - Shadow - as before
Selection - Select None
10.
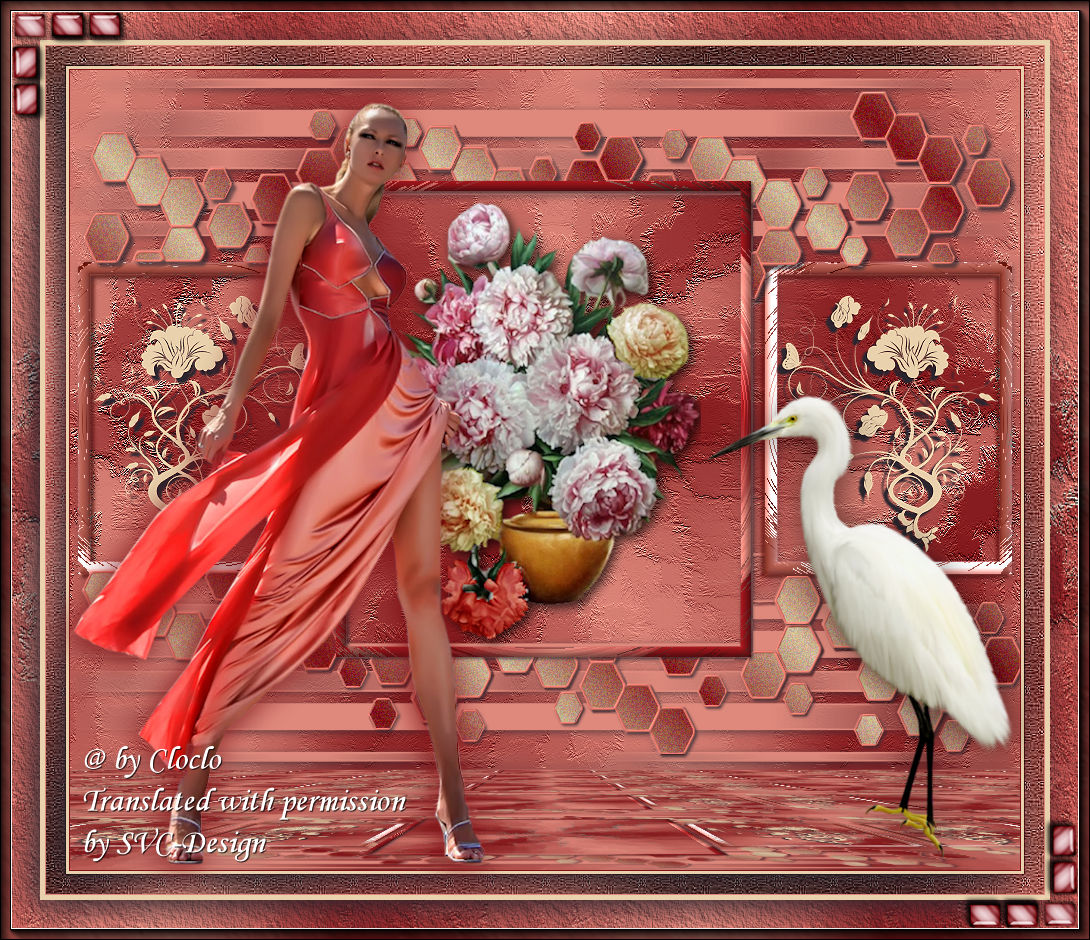
Open vase Cloclo.png
Edit - copy
Edit - paste as a new layer
Place in the rectangle of the center - See final
Open femme Guismo.png
Edit - Copy
Edit - Paste as a New Layer
Place Left - View Final
Effects - 3D Effects - Drop Shadow
4 / -4 / 100 / 45 - Color2
Open oiseau.png
Edit - Copy
Edit - Paste as a New Layer
Place Bottom Right - View Final
Effects - 3D Effects - Drop Shadow
3 / 3 / 50 / 45 color:#000000
Open coin Cloclo.png
Edit - copy
Edit - paste as a new layer
Do not move
Sign your work
Put my watermak
Layer – merge – merge all (flatten)
Image / Resize to 1000 pixels wide
Save as JPG
Back
Copyright Translation © 2022 by SvC-Design